Monday, 27 July 2015

Painfully tedious new things

I hate doing some new things.

That sounds sacrilegious for a creative person, but some things are long and tedious.
What I am about to make is a pleating sheet. Its basically a really large piece of cardboard with straight folds on it.

It's so boring.

I can also think of it as an investment. Once I have made this really long piece of cardboard, I'll never have to make it again.

As a bonus, I can now watch that 5 or so hours in my 'watch later' list on YouTube.

Happy blogging!

Monday, 20 July 2015

How to make a gallery

This is something that I really ought to get onto doing. People keep on asking me: do you have your work online, can you give me an example of your work, etc. It's something vitally important for being an artist. Unfortunately, I have very little interest in being tech nor photography savvy. Photoshop isn't too bad to learn, but still, I have to get the pictures on the computer, then onto the internet. It's something that I will either have to overcome or get lots of help for.

Either way, to remind myself I've saved this video onto my blog so I won't lose it.

(It seems to be the first one google has anyway, and really the only one worth watching from the one's I've seen)

Friday, 17 July 2015

Successful First Exhibition

Last night was my first exhibition. All my friends came late (I may have given them the wrong time,) I was sick with an ear infection, and I didn't win any encouragement awards, but I count it as a success.

A picture taken by a lovely friend of mine of me being proud of my unframed artworks, and hoping that the artist of the painting below them won't sue me.


One of my favourite local artists was there, and I told him which of the paintings were mine. I just so happened to be in view of him when he looked at my paintings, yet out of earshot, so my commentary sounded a little like this:
"He's walking towards my paintings.
Look at my paintings.
Do it.
Looook at them!
YES! He's looking at them!
OH MY GOSH HE POINTED AT THEM.
HE SMILED AT THEM.
HE DOUBLE CHECKED THE NUMBERS TO MAKE SURE THEY WERE MINE."

One thing that someone keeps on asking me is if my works are online, particularly as I invest in more and more stalls. My regular reply is that I have a blog, but not really any of my works up there. It's definitely something I'll need to work on - one page for paintings and sketches and another page for costume. I should make it a priority, but it gets hard when I'm really not a photographer.

Also I sold a painting.

Yes, it was the cheapest painting on sale, and yes, it did sell to my boyfriends housemate, and yes, I had no emotional attachment to it, but it sold. When he said he wanted to buy it, and as I watched him exchange money via card for a piece of my soul, I felt like I was going to cry.

The small blue one in the bottom right corner that one. What's more exciting is when I eventually create a gallery, that one will have a lovely "SOLD" across it. (Or in the description, either or.)

Overall, it was a lovely night. After the event ended, my friends shouted me chai. I felt so loved and celebrated and even though the earnings of the painting will pay for approximately one third of my semester, it made me feel like I am succeeding at life.

Sunday, 12 July 2015

Steampunk Skirt design

I have started to develop a steampunk style skirt, which when in it's original form, looks like a simple victorian or edwardian skirt, but has many styles im which it can be strung up. It's a skirt that's really fun to play with.

I'm waiting and putting it out there to the public about getting it properly photographed, because right now it doesn't look as amazing as it actually is. I'm asking the public for assistance in this area, mostly students who are after experience due to money.

For now, these pictures from my phone taken by my musician housemate will have to do.

Monday, 6 July 2015

My Maze Addiction

When at work, and it's quiet, I find myself with a pen and a paper, doodling.
Not just any doodles though. Mazes.
It started out just looking for something to fill the quiet times when there were no customers. When the home improvement store first opened, there were many of these. Firstly, I would bring in a maze to do. Then a harder maze. Then an impossible maze. After I grew bored with that, I started drawing them. They started out rather poorly, but as I kept on drawing and googling techniques, they became more and more intricate.

Something that I am slowly mastering is the art of drawing a maze without pencil marks - pen only. No second chance. No 'undo' button. You may be thinking that I'm doing this as some sort of challenge - to force my brain to think in different ways, to be resourceful, to think before I draw, to map out and plan in my head before I act.

Mostly it's because I use what I have available to me.

It's always a bonus knowing that I might have been an architect in Maze Runner, or, if given the challenge in Inception, I would totally be able to draw a maze in under ten minutes, (not that I've completely seen either of these movies.)

When I started, it was rather difficult for me. Firstly I started just drawing lines with openings, much like the girl in Inception started, but it became hard to keep up with which path lead were. Then, I began to draw the dead-ends first, then the path would be created around them. After I read this article here, I began to use the bottleneck technique, along-side the dead-ends-first technique, which so far have made me my most difficult mazes.


The one on the bottom right was one of my earlier ones - though the tree one is far more simple, the square one required the least lateral thinking. Also, I used pencil before using pen, which caused my free-hand lines to appear much more parallel.

The curvy, non-angular, all-over-the-shop maze wasn't my first attempt at this maze. Actually, these ones are the most difficult, as it's easy to lose yourself in the squiggles, even for the person drawing it.

These ones are earlier still. The one on the bottom left was an attempt to make a more artistic, pattern-y maze.


HOW TO TEST A MAZE

Generally, when I test a maze, I test it thoroughly. (Mostly it's because the entire purpose of doing this is to kill time) How I do this is very simple - photocopy the maze onto another sheet of paper and highlight all the dead ends.

This one that I highlighted in green* highlighter shows me that to the left, there are more than one ways of getting to the exit. The path to the right is a loop - that is something I would fill in later.


This is one from work on scrap paper. As you can see, I have notes down the side of the paper, and down the bottom shows the piece of paper was originally used for something else (one of those, "they printed out an extra bit of paper just with the website on it" situations)

Basically, what I'm doing as described above is isolating the dead ends. I start out with the obvious dead ends - ones were  there's a hallway that leads to no-where. Now, what we define as a dead-end is an area with only one entrance no matter how many loops it may have.


Block dead-ends can be easily detected and highlighted all at once.


(This is so professional, you can even see my drink bottle at the top there...)


The whole section above is one giant loop - it loops itself around and comes out again. Remember, our definition of a dead-end isn't somewhere where you hit a brick wall, but an area with only one entrance.


Once you get to this stage, you can really see where the dead-ends are, and you vaguely know where you're going.


Tada! When you've highlighted all the possible dead-ends, and you only have one path, you know you've made a proper maze.

Happy mazing!


Sunday, 28 June 2015

Hand-Stenciled Leggings

"Hand-stenciled leggings" sound much classier than trying to hide the fact that the lines were stenciled, because otherwise it might appear that I was trying to pass off my stenciling as genuine, where as if I blatantly put "hand-stenciled" in the description, then people will appreciate its unique quality.

These will be sold at my stall at the upcoming Pirate Market Tavern Night in a couple of months.


Here are my pieces on the line to dry.


I soak everything in soapy warm water. In reality, I don't need soap - the acrylic will dissolve in water if it hasn't dried yet. And it doesn't need to be warm either - it just feels better.


And here is my stencil piece, hanging out to dry. I hosed it off after I soaked it.

Happy blogging everyone!


Thursday, 25 June 2015

First Art Exhibition

I am very excited (well, at this point I'm rather blasé) to have my first art exhibition at the Victorian Artist's Society!
Not only that, but my teacher is keen to introduce my work to the Melbourne Women's Artist's Society also, which is highly optimistic, however I'm also rather lackadaisical also about that also. Not that it isn't something to be absolutely thrilled about, but more so I don't want to get too excited too quickly. (For example, I've been excited enough to tell people about it, but not enough to actually Google who they are, or to check if their name is correct.)
Thing about trying to do art is that it doesn't work. You have an amazing image inside your head that would make the the angels themselves weep, you try it, it doesn't work, you get stressed and throw a tantrum, and in that splash of paint flying everywhere without really caring, some lands on a piece of paper, you look at it, and think, you know what, that's not bad. That's how I seem to be working recently. Ergo, don't try to get 'it'. Just keep paint.
(I congratulate anyone who read that sentence-paragraph above)

Now that I've typed all that out, I feel like I've rather convinced myself to text my art teacher and ask her about the women's artists society and actually do some research.

Happy painting!

Sunday, 21 June 2015

Stamping experiments

A few weeks ago, I set out to create a stamp long stamp for the purpose of edging my fabric pieces for my stalls. I created to (and one of them I'm still working on) and they took about an average of twenty hours each.

The one below is just chilling on it's rightful place on the mantle piece (though now it's much dirtier).


I experimented with many things finding one thing for sure - acrylic paint does not work in the slightest.


These are the ones done with watercolour on paper, dabbing it onto the stamp whilst wet. The pigment comes off much clearer and brighter than acrylic does.


I did a gradient wash with watercolour, and then stamped watercolour onto the bottom while the paper was still wet. It created that ghost-like appearance. The one above it in dark indigo was a stamping done after it had dried. The flecks of white you see are attempts at acrylic paint.

So then I moved onto oil paint.


Sure, I still have blue all over my stamp and everything, however it still works. Still, I should look into how to remove oil paint from things in greater depths.


The blue above is oil colour, and the white one below is acrylic. As you can see, the white doesn't come out nearly as strongly as the oil paint does. My boyfriend even suggested that it didn't come out as clearly as the blue because I used grey, before I told him I used a white paint.


Stretched fabric.


Leather. I definitely like the effects of how it appears on leather.


So there you have my stamping experiments. Next step - working out how to make oil paint come out of my stamp and roller and how to figure out how to make it dry faster!


Friday, 12 June 2015

Painting Techniques from Dcreamscapes


Sometimes, when I am totally stuck in the rut of I-MUST-DO-SOMETHING-GOOD-NOW-OR-I'LL-BECOME-A-STARVING-ARTIST, that's generally a time where I have to really loosen up. No one really cares if the pictures look like they do in my head, because they can't see them anyway. That's why it's really good just to borrow a book from the library, open it up, and just pick something to practice.


This one is one I often go to. It may not be 'fine art', but I love her use of colour, movement and her lighting. One thing that you cannot find in a regular art book is how to do fantasy lighting. It's very different to natural lighting. She always goes into exceptional detail about the steps she has taken in her painting - she doesn't keep many secrets.

I've applied her use of light and glow in a small sketch (3'x4')  in watercolour.


Another great thing about picking up a book and just going for it is that you end up doing things you wouldn't usually do, like start with shadows instead of adding them in last, nor would I try shadows in blue for the face.


I've used salt around the edges to create that textured look.


The white spaces were going to be leaves, but I liked them there, so I kept it like that.


It was a good experiment to try, and definitely something I'd recommend to all people with a valid library card!

Sunday, 15 February 2015

The adventures of creating a hoop-skirt part two

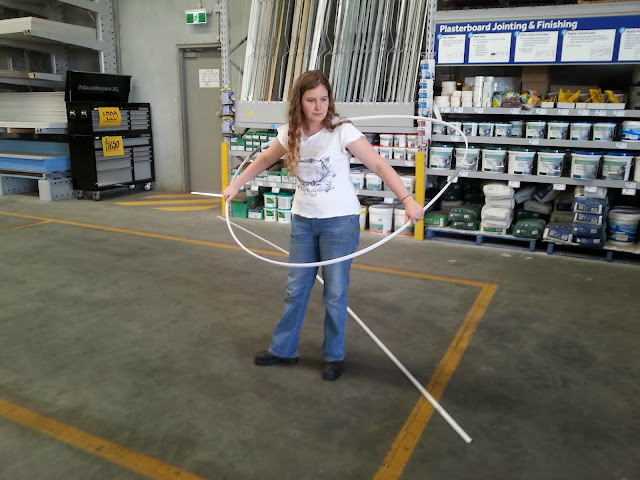
You may have seen this image already, where I went to my local Masters store (Australian equivalent of Lowes)  to find something that can hold its shape and weight as a hoop-skirt without buckling or without needing an extra layer for a particular style of dance.

You are about to read the saddest story ever told.
(As sad as hoop-skirt stories go anyway.


They were completely fine with me going around an trying to turn their things into a circle. Yellow tongue seemed very promising if I was to make a bustle skirt, but couldn't hold itself without buckling. However, I will have to keep that one in mind.

The best I could find was plasterboard jointer. It made such a clean circle when stuck around without any effort in my half. The downside (or the only downside I could see for now) was that it needed duct tape to hold it together, making it seem unprofessional. That didn't deter me - I was the only one to know.


I did this outside, as my studio had too many things in the way. I probably could have done it all inside, but it wouldn't have fitted quite as well. Unless I moved my work table outside, but doing this outside was much easier.


I threaded it through, then wound the two ends in duct tape to finish it.


It did everything I wanted it to do - it could hold it's circular shape even when lifted and weighed down by the heavy fabric I used for the toile.


At this stage, I thought that my toil (or prototype) was complete, that I wouldn't have to search any more for a hoop or boning. So, I started to sew up the waistband (because I only held it with a belt while making the toile)


And I thought the image was so humorous, I decided to make it into a meme.


So everything was fine. I bent it previously to see how much bending it could take. I bent it quite a lot before it took serious damage, so I assumed it would be fine. I tested it in the car, to see that it would fit. I even did this BEFORE I left the store. Even then I bent it to the point of no-return, I managed to fix it with duct tape and a pencil. The plasterboard joiner seemed like the one.


Until I got to the studio.

I was about to meet the CEO of the dance company, when, while doing a parallel park, I moved the hem of the skirt out of the way and a chink occurred.

One little moment. One little chink.

I stood with my boot open for a while, staring at it. The chink ruined the whole shape. It was now a tear-drop shape instead of a circle. I was already late (I blame St Kilda Rd) and now I didn't have anything tangible to show her. I internally promised myself, I will not cry, I will not cry.


Even though it's too late for the skirt idea to be in this show, I would still like to figure out the perfect, non-buckling, car-proof hoop for a hoop-skirt. Perhaps next show, or the one after that, could then use it.


Monday, 2 February 2015

Strange things they let you do at Masters Home Improvement

Was looking for a hoop that can stand on its own, slightly flexible and not too heavy. This isn't something that will become a crinoline as you might suppose,  but a dance instrument.
Simply tell them you'll bring your own duct tape, and then kindly ask the department manager to take a picture of your experiments for your blog.
I ended up using plasterboard link strips. I hope it keeps its shape for the skirt!

Sunday, 25 January 2015

Working on Australia Day and sketch

So there's nothing better than spending your public holiday working in a timber yard for double time and a half. Catch is, tradies don't work on public holidays. It's pretty quiet out here.
So my sketch tip to me today is draw from everything - tutorials, sketches, paintings, real life, photography. You'll be using different parts of the brain for each.

Saturday, 24 January 2015

Sketches

Sometimes the hardest thing after losing ones confidence is to just pick up your Biro and try again.
I've been losing momentum - and I know I've been losing momentum - getting caught up with how great everyone's artwork is and how I'm not there yet. I read a very simple article on how to be a great artist. It took them about a thousand words to say, "just keep sketching, sketching, sketching..." it suggested to sketch endlessly, on the bus, in the waiting room, always, from reference or imagination.
That's sometimes the hardest part, just doing it. There's no use waiting for inspiration to hit, something to click or to start believingmI'm yourself. Just pick up that Biro and start drawing.
And look! That wasn't so bad now, was it?


The ones above were from imagination (mostly - the face of "The Voice" and the cow from "Girl with a Cow on Her Head" had inspiration from ads and people walking by)
The article also mentioned that one should always practice their flaws. Well, my current flaws is my feet, so today during work (as a check-out chick in a timer yard) I draw some feet on the back of a receipt. So, yes, these ones are much smaller than they appear on screen.

Monday, 19 January 2015

Figure Measurements Sheets

There have been a lot of things coming up in recent days that are great opportunities to design awesome creations, keep me busy, and drive me insane. I'm looking forward to every bit of it!

One thing that I've known in my head (as we were taught in class) is that nothing will be handed to you, and that you'll be responsible for everything you create - providing the labor, the colouring pencils, time sheets, breakdowns. Everything.
I knew that in my head, it's another thing to see it in reality. For example, there simply isn't a measurements sheet that suits my style of pattern drafting. (For example, very few, if any, measurement sheets do Waist to Seat in figure 11, but instead wrap the measuring tape around the crotch. Waist to Seat is just as effective, and far, far less intrusive!)
I think somewhere in my mind I had the idea that pattern drafting was pattern drafting, and that was that. No, apparently not. I looked and looked far and wide across the internet, yet I could not find something that suited the way I do things. So, I had to take it into my own hands.

Firstly was to draw the figure. Every figure that was in similar pose to what I needed was already scribbled with writing, so I couldn't use those. So, from scratch I drew my own figure. It's not as neat as the others, but it suits my needs.
So here it is - my measurements sheet.


Going through old photos (Galadriel Costume)

A friend of mine recently asked me to be costume designer for her fashion shoot "Gothic Forest." I was looking for something to put up on the Pinterest board, thinking that I didn't have any pictures of anything that I had made. When, lo and behold, an old image of my Galadriel costume was found!

Terrible resolution, but it shows the dress well enough.